Next.js Full-Stack Auth: Better-Auth + Drizzle ORM Guide
🛠️ Pre-Flight Configuration
Tech Stack: TypeScript, Next.js, PostgresDB
Prerequisites: Basic understanding of next.js
GitHub Repository: link
Live Link - link
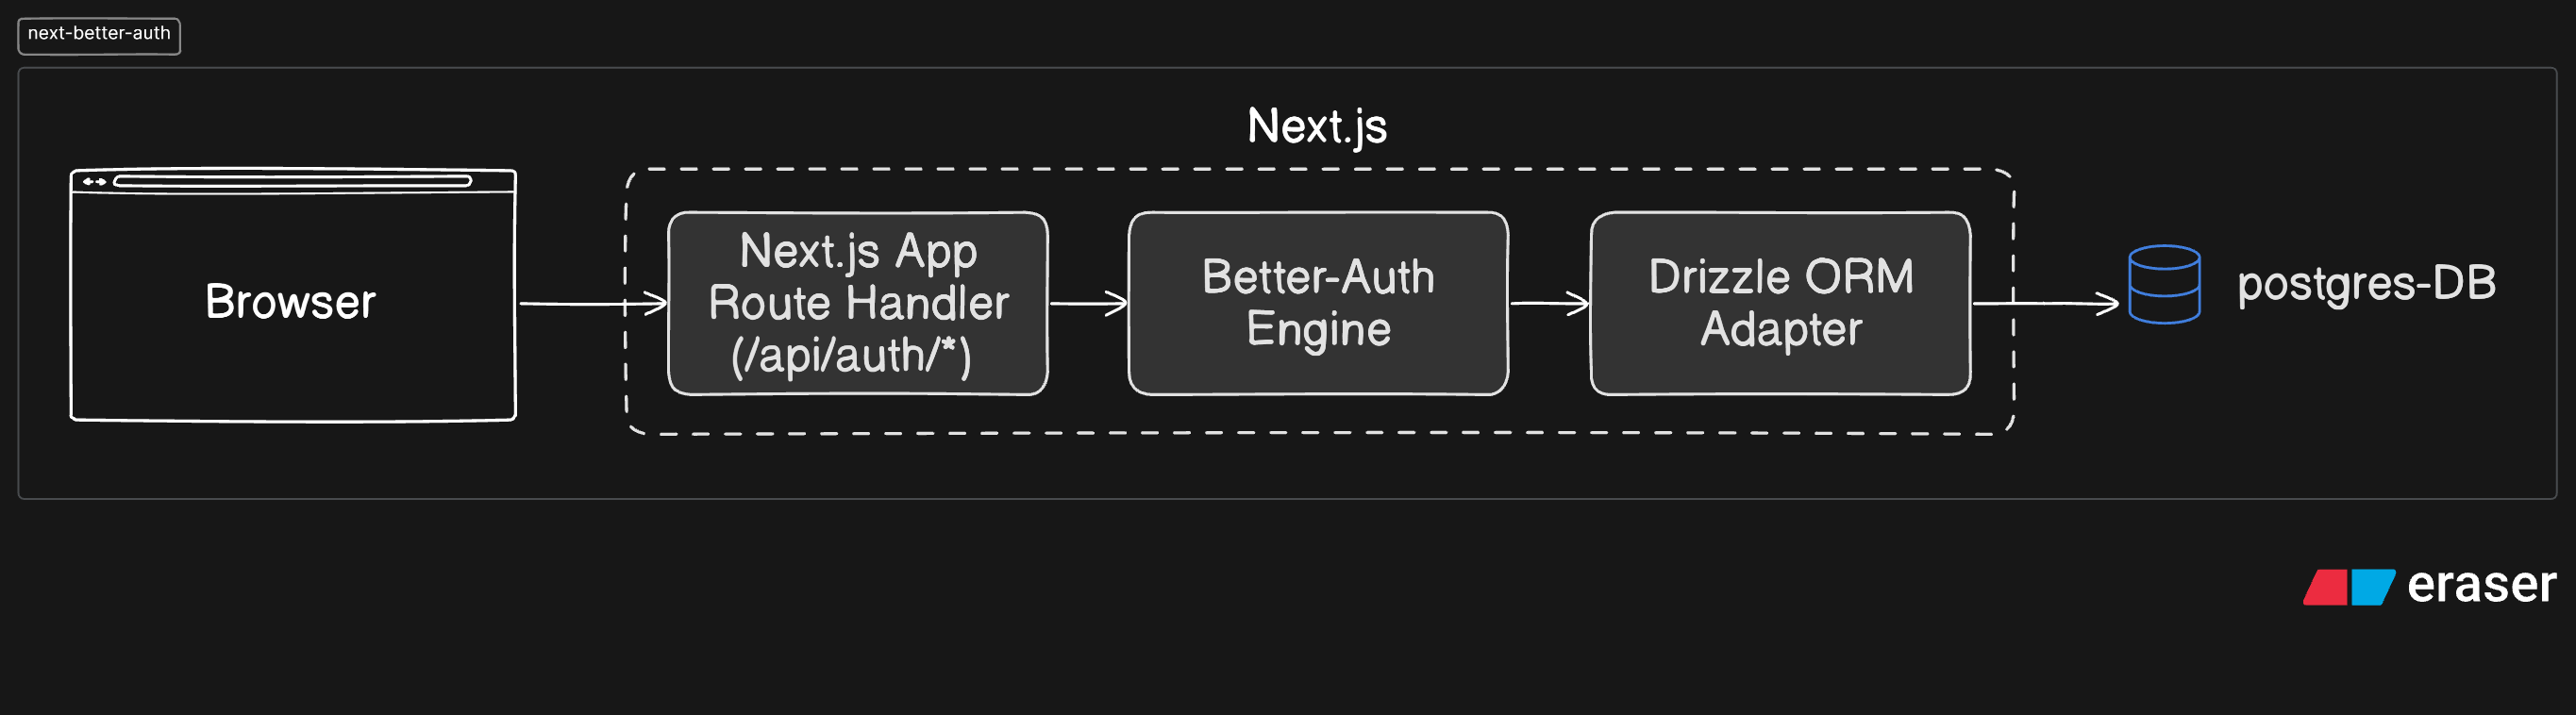
In this guide, we will implement production-ready authentication in Next.js using Better-Auth, Drizzle ORM, and PostgreSQL.
Project setup
Installation
# Next.js
pnpm create next-app@latest next-better-template

# Better-auth
pnpm add better-auth

# Drizzle
pnpm add drizzle-orm pg
pnpm add -D drizzle-kit tsx @types/pg
PostgresDB installation
Before configuring Better-Auth, you need an active PostgreSQL instance. We will spin up a local container using Docker Compose, though you can also use managed services like Neon or Supabase.
docker-compose.yaml
# docker-compose.yaml
services:
  db:
    image: pgvector/pgvector:pg16
    environment:
      POSTGRES_USER: postgres
      POSTGRES_PASSWORD: postgres
      POSTGRES_DB: mydb
    ports:
      - "5432:5432"
    volumes:
      - pgdata:/var/lib/postgresql/data

volumes:
  pgdata:
Run following command install images and run pg container on local port 5432
docker compose up -d
Configuration
Set Environment Variables .env
# You can also use openssl rand -base64 32 to generate
BETTER_AUTH_SECRET= <secret key>

BETTER_AUTH_URL="http://localhost:3000" # Base URL of your app

DATABASE_URL= "postgres://postgres:postgres@localhost:5432/mydb"
Drizzle
📦 <project root>
 ├ 📂 drizzle
 ├ 📂 src
 │   ├ 📂 db
 │   │  └ 📂 schema
 |	 |		 └📜 auth-schema.ts
 │   └ 📜 index.ts
 ├ 📜 .env
 ├ 📜 drizzle.config.ts
 ├ 📜 package.json
 └ 📜 tsconfig.json
Connect Drizzle ORM to the database:
Create a index.ts file in the src directory and initialize the connection:
// src/db/index.ts
import { drizzle } from 'drizzle-orm/node-postgres';

export const db = drizzle(process.env.DATABASE_URL!);
Setup Drizzle config file:
Drizzle config - a configuration file that is used by Drizzle Kit and contains all the information about your database connection, migration folder and schema files.
Create a drizzle.config.ts file in the root of your project and add the following content:
// drizzle.config.ts
import { defineConfig } from 'drizzle-kit';

export default defineConfig({
  out: './drizzle',
  schema: './src/db/schema',
  dialect: 'postgresql',
  dbCredentials: {
    url: process.env.DATABASE_URL!,
  },
});
Setup migration script
Add following script inside package.json file for generate and apply migration.
// package.json

"scripts": {
    "migration:generate": "npx drizzle-kit generate --config=drizzle.config.ts",
    "migration:migrate": "npx drizzle-kit migrate --config=drizzle.config.ts"
  }
Better-auth
Create A Better Auth Instance and connect DB:
Create a file named auth.ts inside file src/lib
Configure Database using Drizzle-ORM using built in adapter
// src/lib/auth.ts

import { db } from "@/db";
import { betterAuth } from "better-auth";
import { drizzleAdapter } from "better-auth/adapters/drizzle";

export const auth = betterAuth({
  database: drizzleAdapter(db, {
    provider: "pg",
  }),
});
Create database table
Better Auth includes a CLI tool to help manage the schema required by the library.
Generate: This command generates an ORM schema or SQL migration file.
pnpm dlx auth@latest generate
Important: The CLI outputs
auth-schema.tsto your root directory. Move this file tosrc/db/schema/to keep your database models modular and co-located.
Provide generated
auth-schemato drizzleAdapter schema property.// src/lib/auth.ts import { db } from "@/db"; import { schema } from "@/db/schema/auth-schema"; import { betterAuth } from "better-auth"; import { drizzleAdapter } from "better-auth/adapters/drizzle"; export const auth = betterAuth({ database: drizzleAdapter(db, { provider: "pg", // provide auth schema to schema property schema: schema, }), });
Applying changes to the database
Run the following script to generate sql migration file of
auth-schema.tswhich locate insidedrizzlefolderpnpm run migration:generateAfter creating migration file we migrate sql file to generate tables (user, account, session and verification) inside pg database using following script
pnpm run migration:migrate
Sign-In Methods
1. Email and password
We have to enable email and password option in auth.ts file
// src/lib/auth.ts
import { db } from "@/db";
import { schema } from "@/db/schema/auth-schema";
import { betterAuth } from "better-auth";
import { drizzleAdapter } from "better-auth/adapters/drizzle";

export const auth = betterAuth({
  database: drizzleAdapter(db, {
    provider: "pg",
    schema: schema,
  }),
  // to use email and password
  emailAndPassword: {
    enabled: true,
  },
});
Route handler
To handle API requests, you need to set up a route handler on your server src/app/api/auth/[...all]/route.ts
// src/app/api/auth/[...all]/route.ts
import { auth } from "@/lib/auth"; // path to your auth file
import { toNextJsHandler } from "better-auth/next-js";

export const { POST, GET } = toNextJsHandler(auth);
Create client instance
The Better-Auth client provides strongly typed authentication helpers to manage client-side state, sessions, and social logins.
src/lib/auth-client.ts
// src/lib/auth-client.ts
import { createAuthClient } from "better-auth/react"
export const authClient = createAuthClient({
    /** The base URL of the server (optional if you're using the same domain) */
    baseURL: "http://localhost:3000"
})
Usage
using authClient we can use signIn and signUp methods
import { authClient } from "@/lib/auth-client";

// signup
await authClient.signUp.email(
        {
          email: value.email,
          password: value.password,
          name: value.username,
          callbackURL: "/",
        },
        {
          onRequest: (ctx) => {
            //show loading
          },
          onSuccess: (ctx) => {
            //redirect to the dashboard or sign in page
          },
          onError: (ctx) => {
            // display the error message
          },
        },
      );

   // signin
   await authClient.signIn.email(
        {
          email: value.email,
          password: value.password,
          callbackURL: "/",
        },
        {
          onRequest: (ctx) => {
            //show loading
          },
          onSuccess: (ctx) => {
            //redirect to the dashboard or sign in page
          },
          onError: (ctx) => {
            // display the error message
          },
        },
      );
2. Google
Get your google credential on Google Cloud Console.
1: Set consent screen
2: Create OAuth client ID → Choose Web application
Add your redirect URIs:
http://localhost:3000/api/auth/callback/google(for local development)https://your-domain.com/api/auth/callback/google(for production)
3: Copy the Client ID and Client Secret into your environment variables
Configure the provider:
To configure the provider, you need to pass the the clientId and clientSecret with other options in socialProviders.google for your auth configuration.
// src/lib/auth.ts
import { betterAuth } from "better-auth"

export const auth = betterAuth({
    baseURL: process.env.BETTER_AUTH_URL,
    socialProviders: {
        google: {
            clientId: process.env.GOOGLE_CLIENT_ID as string,
            clientSecret: process.env.GOOGLE_CLIENT_SECRET as string,
            // to get refresh token
            accessType: "offline",
            // always ask the user to select an account
			      prompt: "select_account consent",
        },
    },
})
Usage:
you can use the signIn.social function provided by the client for both signin and signout form. The signIn function takes an object with the following properties:
provider: The provider to use. It should be set togoogle.import { createAuthClient } from "better-auth/client"; const authClient = createAuthClient(); const signIn = async () => { const data = await authClient.signIn.social({ provider: "google", }); };
3. GitHub
GitHub credential:
To use GitHub sign in, you need a client ID and client secret. You can get them from the GitHub Developer Portal. Make sure to set the redirect URL to http://localhost:3000/api/auth/callback/github for local development
Configure the provider:
// src/lib/auth.ts
import { betterAuth } from "better-auth"

export const auth = betterAuth({
    socialProviders: {
        github: {
            clientId: process.env.GITHUB_CLIENT_ID as string,
            clientSecret: process.env.GITHUB_CLIENT_SECRET as string,
        },
    },
})
Usage:
you can use the signIn.social function provided by the client. The signIn function takes an object with the following properties:
provider: The provider to use. It should be set togithub.import { createAuthClient } from "better-auth/client"; const authClient = createAuthClient(); const signIn = async () => { const data = await authClient.signIn.social({ provider: "github", }); };
Logout Method
you can use the signOut() method provide by authClient for logout the user.
	import { authClient } from "@/lib/auth-client";

  const logout = async () => {
    await authClient.signOut({
      fetchOptions: {
        onSuccess: () => {
          // redirect to home page
        },
      },
    });
  };;
How to protect route
1. Public layout
Authenticates incoming requests on protected layouts by checking for an active session; unauthenticated traffic is redirected to /signin.
// src/app/layout.ts
import { cn } from "@/lib/utils";
import "./globals.css";
import { auth } from "@/lib/auth";
import { headers } from "next/headers";
import { redirect } from "next/navigation";

export default async function RootLayout({ children }: LayoutProps<"/">) {
  const session = await auth.api.getSession({
    headers: await headers(),
  });

  if (!session) {
    redirect("/signin");
  }

  return (
    <html
      lang="en"
      className={cn(
        "h-full",
        "antialiased",
        "font-sans",
      )}
    >
      <body className="min-h-full flex flex-col">
        {children}
      </body>
    </html>
  );
}
2. Auth layout
Prevents authenticated users from re-accessing login or registration pages by redirecting active sessions directly to the dashboard root.
// src/app/(auth)/layout.ts
import { auth } from "@/lib/auth";
import { headers } from "next/headers";
import { redirect } from "next/navigation";

export default async function AuthLayout({
  children,
}: {
  children: React.ReactNode;
}) {
  const session = await auth.api.getSession({
    headers: await headers(),
  })

  if (session) {
    redirect("/");
  }
  return <section>{children}</section>;
}
Reference
Official Document - Better-Auth, Drizzle-ORM, Nextjs


